what this blog is about....


Mom of 3.....Married to "my everything" man....Stay at home mom....Living in a new city/state....In a nice little rental home (for a while)....
On the rebound of going through 2 job losses in 2009....Adjusting....but always....ALWAYS finding myself drawn to the things I am passionate about....
My "PROJECTS"....which is what you will find here on my own little space in cyberworld....Enjoy!

.
.


Pages

Sunday, August 29, 2010

Mbellished Shirt

When I was in Utah last month, my mom and I made a few stops at the DI (Deseret Industries/Thrift Store) I found so many great things, including these 2 *Brand New!!*, 'Shade' brand, t-shirts. With all the great tutorials I've seen out there, I knew I could use the 1 shirt to dress up the other. However, I could never decide, so I came up with my own version. I got this idea from a skirt I have that has a similar pattern. And I didn't have to cut any flowers out or sew anything on by hand. My kind of stuff. :)

First, I took the "extra" shirt and started cutting one long strip of fabric from the bottom, and just continuing on up the shirt. That way, I didn't have to sew any pieces together. Super smart, I thought!


Then I just pinned the long strip on the front of the other shirt in a pattern I liked. I have been a slacker in the past at pinning things on, only to have my project end up a disaster and in the trash, so I made sure this time that I used a lot of pins. It only took an extra few minutes and I'm so glad I did!


Close up....well kind of.


Then, I just sewed down the middle of the strip. There were a lot of stops, pivoting the fabric and pulling out pins, but really, it didn't take me too long and I'm so happy with the way it turned out. I especially love that the sides of the fabric curl up and cover the stitching! This is a perfect project if you are concerned with your sewing abilities, because no one will see them!!


I'm now going to be on the hunt for t-shirts, so I can make some more of these. Contrasting colors would be super cute too! You could even spell out words or other shapes!!

Happy sewing!

More Organization

As you all might know, I LOVE anything dry erasable. Weird fetish, I know.

Here's another thing that is dry erasable....

Magnetic Picture Holders. (I bought mine at Walmart)


And guess what.
They're not just for pictures.
I used mine for individual dry-erase boards
for each member of our family.
It's a great way to keep track of the individual things that are happening
in our family....to stay organized....and to help mom feel like she has
some grip on life and all it's craziness!!
It was super easy.

And they look CUTE on the fridge, which is a bonus!

Just pick some cute paper...light enough that you can see yourwriting, and cut it to size. I used rub-ons to make my titles and adhered them directly to the paper.


And wha-la! Super EASY PEASY!!


Other options.....


Have fun getting organized!!


Thursday, August 19, 2010

Quick and Easy

It's been a crazy summer and I'm sorry I haven't posted much. I have projects EVERYWHERE that are wanting to be finished or started. Now that school has started...(Can't believe school has already started!!), the house is a tad bit more quiet during the day. Hopefully I will have lots of great things to start posting!!

I did this cute craft for my daughter's very plain and boring bedroom. (I did it in just a few hours!!) Remember, we are renting, so I can't do much, but I wanted to do "something" and here's what I came up with....

I saw this CUTE idea HERE. I love this website. They have AMAZING ideas.

You can download the pattern HERE. (great website, by the way, with free patterns!!)


And Viola! I think it turned out super great. The pattern is for a needle case, but obviously you just trace the pattern pieces onto scrapbook paper. You could do it so many different ways! I'm thinking about doing something similar but in black and white for my bedroom.
Have fun with it!


Sunday, July 25, 2010

Getting Organized...

I am a BELIEVER in doing those small things that help keep busy moms and dads "SANE".
With so much INFORMATION coming at you ALL.THE.TIME. it sometimes feels like you are going crazy. Well, at least I do. :)
Which is why I am a huge list maker.
This is what I did today.....


I bought these cute little clip-boards at the DOLLAR TREE a few weeks ago.
Seriously, LOVE that store.


I already had a master list for all of our websites, passwords and other "computer" information.
It was in BIG need of an update.

On my computer, I typed a list
of all the websites we use that require passwords.

I also included some account #'s,
and a few other things that we seem to
need "accessible".

I also changed the 1 list we had to 3 lists...
1 for me,
1 for the hubby,
and 1 for the kiddos and random stuff.

That way, it will be easier to find what we are looking for
on the smaller lists.

I did everything in alphabetical order, by website
then our user name,
then our password.


**Remember, there are just some passwords you
want to memorize and not have out for everyone to see.

But it's a good idea to write them down and keep in a safe place!**


Obviously, I'm not going to take a picture of
our "lists" and put it out there for the world to see....
but you get the idea.

This is what the finished product looked like.


I added the name of whose list it is
at the top, and of course, had to add a flower
for good measure. :)


I hung them RIGHT BY THE COMPUTER, so
it would only take seconds to get the information I need.


And trust me....the hubby will thank you.
(And you will thank yourself!)


Sunday, July 18, 2010

Shoes , Glorious Shoes!

Okay....let's talk shoes.
Every girl loves em'.
Well, most girls do.

I had a sweet friend actually buy me a pair yesterday
that she got a great deal on! Can you believe it?
Now that's a good friend!!! :)
It's funny though...the pair she bought me, I
already had that same pair in my closet.
Great minds MUST think alike.

I decided to do a shoe-redo
on them, to give them a little bit of a different look...which
led me do a few other "shoe -redo's AND staying
up WAY past my bed-time.
But way worth it, as I am so happy for the next
opportunity to wear my "new shoes!!!"

Here goes.

BEFORE

A little TURQUOISE lace.
(my new favorite color,
along with everyone else!)
I just cute a few short pieces,
ran a running stitch along the bottom,
gathered it a bit and tied it off.
And yes, I hot glued them to the shoes.
Not too much glue.
Enough to hold it, but not so much
that when I want to take it off and do
something else, I can.


AFTER
Oh, my heck. I'm so pleased with myself.
Adorable!


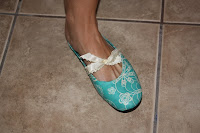
Shoes #2

BEFORE
I bought these from Walmart a while ago. $3.00
Can't beat $3.00!!!

First I took off the bow and the trim.
I also decided I wanted to make them into slip-on's so I
cut the heal off......

"oh, no....what did I do?".....
Well rather than stop midway through,
I continued on.
I cut a piece of fabric that covered the shoe and then some.
then I slit it up the center a bit.
I'm sure there is a tutorial out there
that is more precise, but I just do
things on a whim and figure it
out as I go. Not so smart sometimes,
but I am very impatient. :)
And just mod-podge away! (Yes, I said MOD-PODGE!!!)
I put the shoe ON, to help keep it's
form while I mod-podged and rubbed the material on.
It was pretty helpful.

Don't be stingy on the mod-podge.
Remember, when it dries, it dries clear.
You want your material to be wet with it.

After the outside of the shoe is done,
Trim up the inside and keep enough material to turn-over
to the inside of the shoe. With the rounded part, make
slits in the material and turn those under as well.
Mod-podge really good!


I let them dry overnight.
In the morning I trimmed up the sides with a razor blade,
running the blade just on top of the sole.
If you find any parts that aren't adhered...re-modpodge and let dry.

And there you go!
My favorite part???
I cut slits in the sides of the shoes and ran ribbon
through them. I can change the ribbon out
to whatever I want!


Or leave plain.
And NO ONE is gonna have these shoes!

And last but not least...

I got these cute American Eagle Sandals for
a STEAL, on the Payless Shoe Source website.
$3.00
There were already super cute with the white
ruched ribbon, but I added some embroidered flowers just
for some extra "ooomph". Black rhinestones in the center
make the flowers "pop".
Can't wait to "sport" all my "new" shoes.
Now if I could just be brave enough to leave the house in this lovely
115 degree weather!!!

Now go rummage through your closet ladies,
and see what shoes you can "re-invent"!
Have fun!!!

Participating in...

http://

CreativeShareWednesdays

Tuesday, July 13, 2010

My sweet sister-in-law and I did a shower for our niece this weekend.
I was in charge of the decorations, the "thank-you-for-coming" gifts, and a few of the game prizes.
(My sis-in-law, Anna & me)
I went ALL homemade. It was a lot of work, but fun. And it turned out great. Her wedding colors are red, orange and yellow...in the more "autumn" tones, so I decided to work around that.


My favorite, was this little creation. I gathered some twigs/branches and spray painted them an off-white color. I stuffed them in a vase that I took from a friend, who was getting rid of it. I also painted that - straw yellow. As for the flowers...yes, each one is handmade. I made all different kinds, in different shades of her wedding colors. Each flower is actually a clip, so they can be worn in the hair, as a brooch, or clipped to a purse or bag. This was the "thank-you-for-coming gift, and as everyone left, they got to choose their flower. It was funny, because EVERYONE put theirs in their hair and sat a chatted for a bit. I should have taken a picture!

The cute little bird cage, I got from Michaels. I gave it a light coat of "ocean blue" spray paint, and glued in a bird. I LOVE birds.


For the prize gifts, I just bought a few dollar note pads, mod-podged them in much cuter paper....added a flower/bow, a pen and some cute words. I think they turned out pretty cute. I also made a couple packages of cards. Each set had a variety of different occasion cards. Something EVERYONE could use.


Remember my 'love notes' post? Well, I made one for the bride as my shower gift. These are so fun and cute, but also so inexpensive and easy to make!!

Dressing up the "beverages" added to the "decor"
AND, I never once had to tell people what they had
to choose from!!
See those flowers?
My adorable friend help me make those!
You can get the instructions here.
I think they turned out great....and they won't ever die!

And the best part....


My sis-in-law picked up these little beauties for dessert. Heaven! These are from the cupcake shop called "Sprinkles". And they are DE-LISH-OUS! I'm going to have to try all the flavors. My throat is tickling just thinking about it!!!!
Enjoy!
Posted by Picasa
Click HERE