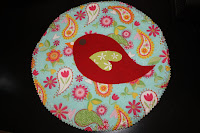
We've been needing a new mouse pad. Ours was ugly, falling apart, AND we don't even use Verizon. Trying to be frugal, I came up with this. Yep! All by my little self.....
1 & 2). Ugly, lame mouse pad
3). Materials: Shelf Liner/Rug gripper "stuff", plastic folder (or chipboard) and material.
4). Cut the gripper in the shape of a circle. Pick any shape you want. I then cut a "just smaller" circle of some "plastic", that was actually a folder divider. This is so the mouse pad has some weight and stiffness to it. Then cut a circle, a little bigger, than the gripper, out of the material. I cut mine with pinking shears to give it some "cuteness".
5). With some I free handed the parts of a bird and 6). ironed them on the back side of material scraps. Cut them out and iron them onto the front of the mouse pad material. I also glued the gripper to the plastic with hot clue, to keep it in place
7). Last step: zig-zag the material onto the gripper. **As seen in the picture above, and by trial and error, I had to place a strip of material on the gripper as I sewed it. The gripper kept catching on the sewing foot and gathering the material. Afterwards, I trimmed the material as close as I could on the stitching.
8). Voila! Dang cute mouse pad!!

















No comments:
Post a Comment